3.1. Administering an Oracle Database
3.1.1. Installing the Oracle Database Server
Install a standard configuration of Oracle Enterprise v10g on the Database Server:
- User starts autorun.exe from Disk1\autorun of the Oracle10gDatabase CDs s
- System presents the Oracle Database 10g – Autorun dialog.
- User selects the Install/Deinstall Products button.
- System presents the Oracle Database 10g Installation dialog.
- Users ensures the Basic Installation is selected and the following fields configured:
- Ensure <drive>:\oracle\product\10.2.0.10\Db_1 is entered as the Oracle Home Location.
- Select Standard Edition as the Installation Type.
- Ensure the Global Database Name is orcl.
- Enter an appropriate Database Password and Confirm Password. (this is used for SYS, SYSTEM, SYSMAN and DBSNMP account)
- User presses the Next button.
- System presents the Oracle Universal Installer: Summary dialog.
- User presses the Install button.
- System presents the installation progress.
Note: the Database Server can be physically deployed on the same server as the Web Server (IIS).
Note: the process to install the Express Edition is very similar except that the default database instance name is XE instead of orcl.
3.1.2. Configuring the Oracle Database Services
Before the Application Service can be started, the Database Services must be running. Typically, this is performed automatically during database server start-up; however, some servers are configured such that they require that the database service be started manually.
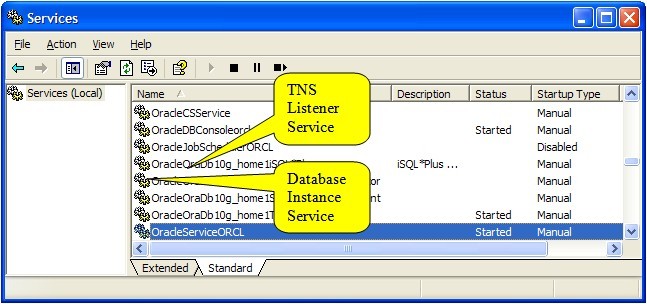
For Oracle databases, the following services must be started:
- OracleService<instance> – the oracle database instance; typically, <instance> = orcl or XE
- Oracle<version>TNSListener – the TNS listener; typically, <version> = OraDb10g_home1 or XE
Both of these services can be manually started using the windows Services Microsoft Management Console and should be configured to automatically start when the server is started.
Note: a SQL Server Agent that is started will interfere with the TNS Listener. Ensure both are not running simultaneously on the same server.
The following Oracle services can optionally be configured as Manual Startup Type as they are not required by Framework:
- OracleCSService
- OracleDBConsoleorcl
- OracleJobSchedulerORCL
- Oracle<version>iSQL*Plus
- Oracle<version>SNMPPeerEncapsulator
- Oracle<version>SNMPPeerMasterAgent
3.1.3. Configuring the Oracle Network Services
Ensure the tnsnames.ora and listener.ora files are configured correctly in D:\oracle\product\10.1.0\Db_2\NETWORK\ADMIN. By default, Oracle configures a HOST element in both of these XML files which specifies a fully qualified host name (including domain). If the TCP/IP domain name is being set dynamically (through DHCP), the TNS listener will be unable to start when the user changes location to another domain.
The simplest solution to this appears to be to manually remove the domain name from the suffix of the hostname in both of these files.
3.1.4. Starting the Oracle Database Services
Ensure the OracleService<instance> and Oracle<version>TNSListener services are started.
3.1.5. Opening Oracle Enterprise Manager
The following procedure can be used to open the Oracle Enterprise Manager (OEM) web application. OEM allows authorized users to administer an Oracle standard or enterprise edition database using a simple web application; specifically, it supports the following administrative capabilities: application management, database management, middleware management, configuration management, quality management, and user experience management:
- Start a web browser
- Open the web application using the following link:
- http://<database hostname>:<oem port>/em/console/logon/logon
Note: typically, 1158 is the default value for the <oem port>.
3.1.6. Tuning the Database
Ensure Oracle’s shared global area (SGA) is set to a reasonable value, subsequently referred to as <max sga size>, measured in MB. At a minimum, this should be 640. Depending on the size of the database, this value may be as high as 4096. Additionally, ensure the maximum open cursors is set to an appropriate value, subsequently referred to as <max open cursors>. At a minimum, it is recommended this value be 1024. This can be accomplished using on of the following approaches:
From the Command Line using an Authorized Account:
- sqlplus / as sysdba
- ALTER SYSTEM SET sga_max_size=<max sga size>m scope=spfile;
- ALTER SYSTEM SET sga_target=<max sga size>m scope=spfile;
- ALTER SYSTEM SET open_cursors=<max open cursors> scope=spfile;
- Restart the Oracle instance using Service Manager
3.1.7 Oracle Parameters
Set the following Oracle database Parameters:
Sessions: 250
Processes: 200
Open_Cursors: 500
sqlplus /nolog
SQL> connect / as sysdba
SQL> show parameters sessions
SQL> alter system set sessions=250 scope=spfile;
SQL> show parameters processes
SQL> alter system set processes=200 scope=spfile;
SQL> show parameters open_cursors
SQL> alter system set open_cursors=500 scope=spfile;
Then restart the database.
Oracle Enterprise Manager
- Open Oracle Enterpirse Manager
- Authenticate using the system user id.
- Navigate to Administration > Memory Parameters.
- Increase Total SGA SGA to <max sga size> Press Apply.
- Confirm Allocation History char is updated to reflect new max
3.1.8. Backing Up a Database Schema
This procedure can be used to backup a database schema using Oracle’s export utility. There are many enterprise-class database backup/management tools available that can be used to achieve a more controlled/automated backup. Customers are strongly encouraged to research these technologies. Additionally, customer must establish a schedule to periodically test their backup/restore procedure. At a minimum, this should include preserving the database data files, performing a backup, performing a restore, and verifying the data was restored properly. A rollback-procedure to restore the database data files should be documented prior to performing tests of this nature.
From the command line using an admin account:
- exp system/<system password> owner=<application user> rows=yes indexes=yes file=exp<date>.dmp log=exp<date>.log consistent=y
This will create a dump file (names exp<data>.dmp) that contains all of the database objects necessary to recreate the schema. Additionally, a n exp<date>.log file will be created that contains the details of what was exported as well as any exceptions that occurred during the export process. Admin must review the log file to ensure the export process completed successfully.
Note: The system account must be used. Do not attempt to export using the <application schema> account.
3.1.9. Restoring a Database Schema
The procedure can be used to restore a database schema using Oracle’s import utility. The recommendations/caveats described in the previous procedure (Backing up a Database Schema) also apply here.
From the command line using an admin account:
- Open SQL Plus, drop the user, create the user, grant the permissions, and exit SQL Plus
- SQLPLUS system/<system password>
- DROP USER <application user> CASCADE
- CREATE USER <application user> PROFILE DEFAULT IDENTIFIED BY cias1234 DEFAULT TABLESPACE USERS QUOTA UNLIMITED ON USERS TEMPORARY TABLESPACE TEMP ACCOUNT UNLOCK
- GRANT CREATE SESSION, CREATE TYPE, CREATE TABLE, CREATE VIEW TO <application user>
- exit
- Import the dump file that was previously exported with the appropriate date:
- imp system/<system password> file=exp<date>.dmp from user=<application user> touser=<application user> log=imp<date>.log
Note: show=y can be used to test what will be imported.
Note: The system account must be used. Do not attempt to import using the <application schema> account.
Note: on some (older?) versions of Oracle, it may be necessary to configure the database to support importing/exporting. It is unclear when this is actually required. It does not appear to be required for Oracle XE or Oracle SE 10.2.0.1.
From the Command Line using an Authorized Account:
- Open SQL Plus:
- sqlplus / as sysdba
- Run the catexp script to configure the database for import/export:
- @?/rdbms/admin/catexp
Administering Java
3.2. Installing Java
- The latest version of the Java2 SDK can be downloaded from Sun at http://java.sun.com
- Open the Java2 SDK executable.
- System presents the License Agreement.
- User selects I accept the terms in the license agreement.
- Chose the installation directory (the default is C:\jdk1.6.0_XX). Recommend dropping the _XX so that the directory remains constant regardless of the minor-version (e.g., C:\jdk1.6.0). Subsequently, this is referred to as the Java home directory.
- System installs the Java 2 SDK SE.
3.3. Configuring Java
Gaining access to the Environment Variables:
- User opens the System icon in the Control Panel.
- System presents the System Properties dialog.
- User selects the Advanced tab.
Adding the Java binaries directory to the path:
- User presses the Environment Variables button.
- System presents the Environment Variable dialog.
- Select the Path variable under the System Variable group and press Edit
- User adds c:\jdk1.6.0\bin; to the start of the Path Variable value.
Adding the Java home directory environment variable:
- User presses the New button.
- System presents the New System Variable dialog.
- User enters JAVA_HOME as the Variable name.
- User enters C:\jdk1.6.0 as the Variable value.